To unzip files on Windows, open File Explorer, right-click the ZIP folder, and select “Extract All” — then choose a destination folder. As of May 2026, Windows 11 also natively supports extracting .rar and .7z files, so most users no longer need third-party software for basic decompression.
Three Methods to Unzip on Windows
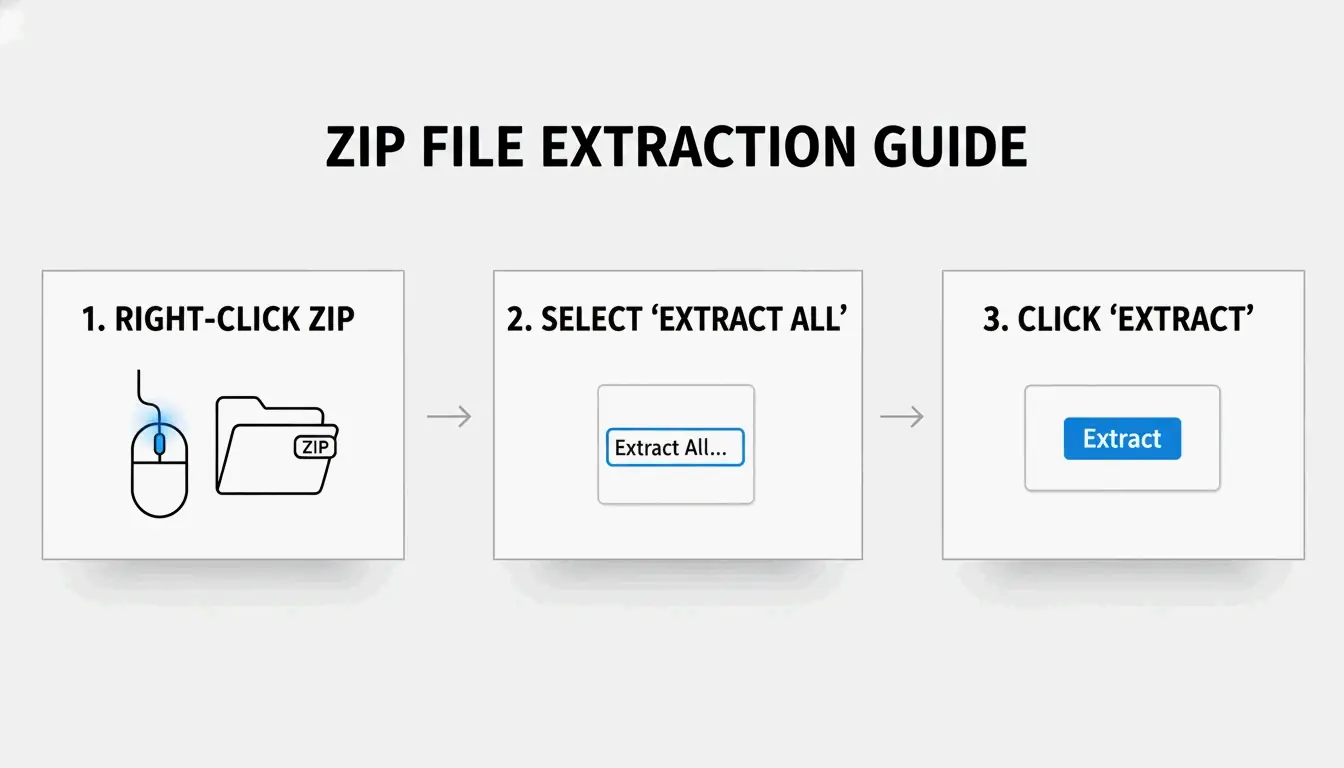
Method 1: Right-Click “Extract All” (Simplest)
- Locate the ZIP file in File Explorer (look for the zipper icon)
- Right-click → Select “Extract All”
- Choose destination — Windows suggests a new folder in the same location
- Click “Extract” — A progress bar appears for large archives
SupportYourTech notes this is the fastest method for most users.
Method 2: Drag-and-Drop Individual Files
Need just one or two files from a large archive? Double-click the ZIP to browse inside, then drag specific items to your desktop or another folder. Windows extracts only those files instantly — no full decompression needed.
Method 3: PowerShell Batch Extraction
For dozens or hundreds of archives, automate with PowerShell:
Get-ChildItem -Path "C:\SourceFolder" -Filter *.zip |
  ForEach-Object {
    Expand-Archive -Path $_.FullName -DestinationPath "C:\DestinationFolder"
  }
Serverman recommends this for IT admins processing bulk data or setting up automated weekly backups.
Windows 11: Native RAR and 7z Support
After the November 2023 update, Windows 11 can extract .rar and .7z files directly in File Explorer — just like ZIP files. Microsoft integrated the open-source libarchive project to make this possible, as noted by PandaOffice Drecov.
Limitation: You can extract RAR/7z, but Windows still only creates ZIP archives. For creating .7z or .rar files, you need a dedicated app.
| Format | Extract (Win 11) | Create (Win 11) | Windows 10 |
|---|---|---|---|
| ZIP | Native | Native | Native |
| RAR | Native | No | Requires third-party app |
| 7z | Native | No | Requires third-party app |
| GZIP / TAR / BZIP2 | No | No | Requires third-party app |
When to Use 7-Zip or WinRAR Instead
The built-in Windows tool does not support AES-256 encryption for creating password-protected archives. For sensitive data (medical records, tax returns), use a dedicated tool.
| Feature | Windows Built-in | 7-Zip | WinRAR |
|---|---|---|---|
| Create ZIP | Yes | Yes | Yes |
| Create 7z (LZMA2) | No | Yes | No |
| Create RAR | No | No | Yes |
| AES-256 encryption | No | Yes | Yes |
| CRC error recovery | Limited | Strong | Strong |
| Price | Free | Free | Paid (trial) |
ZIP Extractor notes that desktop apps like 7-Zip offer better protection against corrupted files and CRC errors compared to browser-based tools.
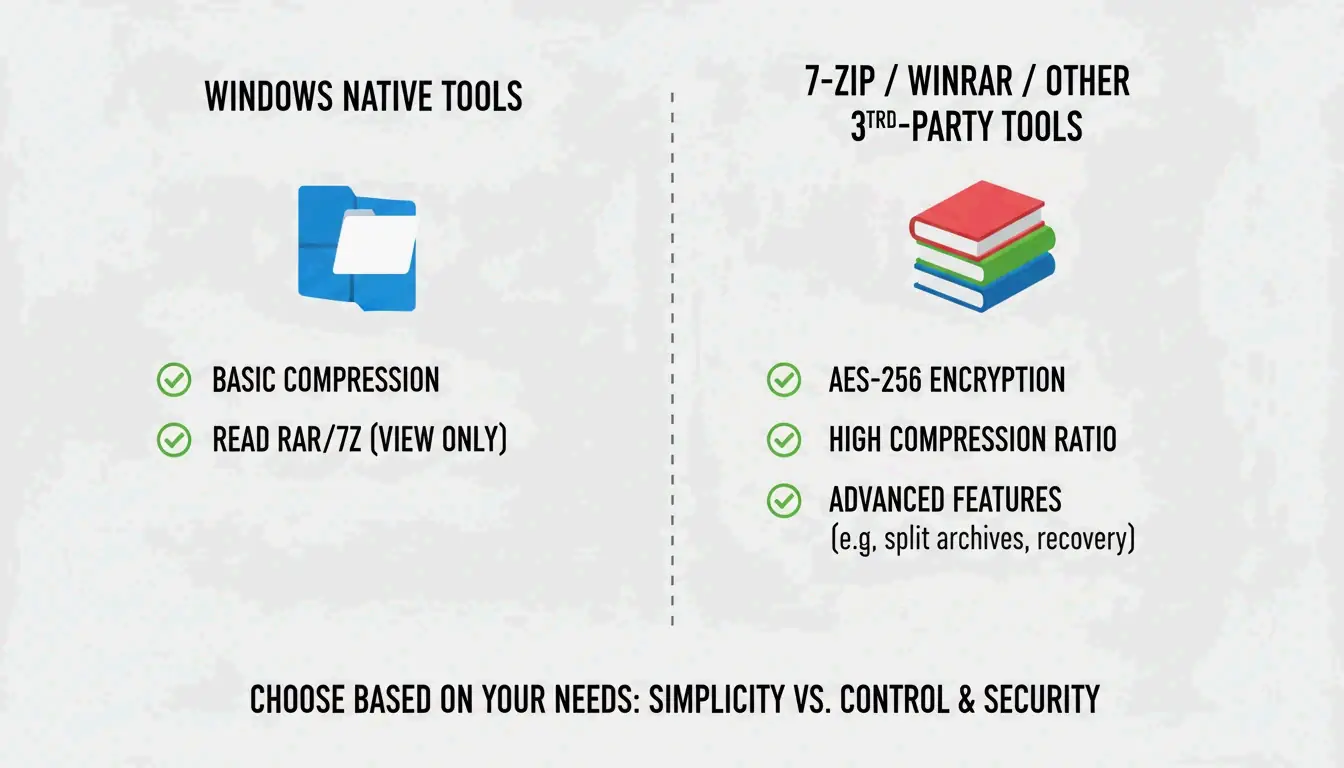
Use 7-Zip or WinRAR when:
– Opening password-protected files with AES-256 encryption
– Maximum compression is needed (LZMA/LZMA2 algorithms)
– Working with GZIP, TAR, or BZIP2 formats
Compression Ratios by File Type
Not all files compress equally. Serverman provides useful benchmarks:
| File Type | Typical Compression | Why |
|---|---|---|
| Text documents / spreadsheets | 60–90% | Highly repetitive data compresses well |
| PDFs | 20–40% | Partially compressed already |
| JPEG / MP3 / MP4 | Less than 1% | Already compressed by their own codecs |
| RAW images / BMP | 40–70% | Uncompressed pixel data |
Modern Windows uses the ZIP64 extension, supporting archives up to 16 exabytes — more than enough for any real-world scenario, per Wikipedia.
Conclusion
For most users, right-click “Extract All” in File Explorer handles ZIP, RAR, and 7z extraction on Windows 11. Use PowerShell for batch jobs, and install 7-Zip when you need AES-256 encryption or maximum compression. Always ensure sufficient disk space before extracting large archives.
FAQ
What is the difference between ‘Extract All’ and double-clicking a ZIP?
Double-clicking lets you browse inside without decompressing — files appear but won’t run correctly. “Extract All” fully unpacks the data into a normal folder, which is necessary for apps, installers, and files that interact with your system.
Why can’t I see the ‘Extract All’ option?
You may have clicked a regular folder instead of a compressed archive (check the extension is .zip, .rar, or .7z). If WinRAR is installed, it may have replaced the default context menu. Try “Open With → File Explorer” to restore the native option.
How do I unzip password-protected files when Windows fails?
The built-in tool doesn’t handle high-level encryption. Use 7-Zip or WinRAR — both support AES-256 encryption that Windows cannot process natively.