If you want to understand where software is heading, stop looking at the code and start looking at the screen.
When OpenAI released their Codex for (almost) everything update, it was not just another developer feature. The announcement revealed something bigger: Codex has broken out of the IDE. It is now an autonomous agent that navigates macOS — seeing the screen, clicking buttons, and typing text with its own cursor.
The core takeaway is a paradigm shift. For decades, software automation required “Code-to-Code” translation. If you wanted two applications to communicate, a developer had to build an Application Programming Interface (API). What Codex demonstrates is that we are entering the “Vision-to-Action” era. The AI relies on Multimodal Computer Vision to read the desktop and interacts directly with the operating system.
In short: the visual interface you use every day is the new API.
Decoding the Architecture: How Codex Drives the Mac
If you have ever built an automation script with traditional tools like Selenium or AppleScript, you know how fragile they are. A website updates its HTML, a button shifts a few pixels, and the entire script breaks.
The official OpenAI post explicitly states that Codex operates “by seeing, clicking, and typing,” handling tasks like “GUI-only bugs.” This confirms that OpenAI has built a Large Action Model (LAM) — a system that perceives and acts rather than merely processing text.
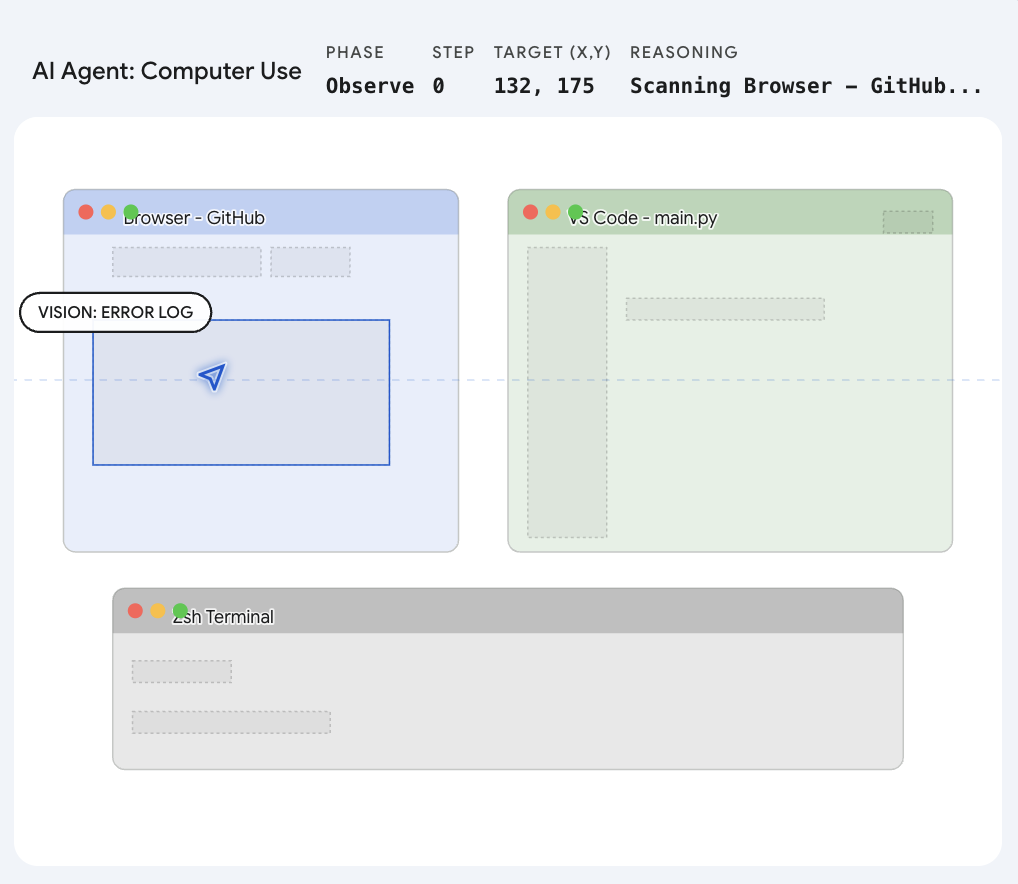
1. Semantic Vision Over Blind Coordinates
Codex is not clicking pre-programmed screen positions. It uses a semantic grounding engine. When instructed to “click the login button,” the model takes a rapid snapshot of the desktop, visually recognizes the concept of a login button — regardless of which application it appears in or how it is styled — and mathematically translates that visual target into precise (x, y) pixel coordinates on the specific screen.
2. Tapping into the OS Nervous System
A cloud-based AI cannot move a cursor through physical hardware. Instead, it talks directly to Apple’s deepest system frameworks. The Codex desktop application almost certainly hooks into Quartz Event Services and the native Accessibility API. It synthesizes a “mouse down” or “key press” event and injects it straight into the macOS kernel. To the Mac, this synthetic click is indistinguishable from a physical trackpad press.
3. The “Ghost Cursor” Illusion
One of the most notable claims is that Codex runs “without taking over your computer.” To achieve this, the system likely uses virtual display buffers or targets specific background process IDs. It creates a ghost environment where the AI can click through a web scraper or run a simulator test, leaving the physical cursor free for the user to continue typing an email uninterrupted.
This approach closely tracks with the trajectory set when Anthropic launched their “Computer Use” feature. The race to master the desktop is underway.
| Mechanism | What It Does | Why It Matters |
|---|---|---|
| Semantic Vision | Recognizes UI elements by appearance, not code | Works across any app without API access |
| Event Injection | Synthesizes native input events via Quartz | Indistinguishable from real user input |
| Ghost Cursor | Operates in virtual display buffers | User keeps full control of their physical cursor |
What This Means for Daily Work
The evolution of Codex from a coding assistant to a native desktop operator changes the constraints of modern workflows. If an AI can use a mouse and keyboard, it does not need custom integrations for Jira, Slack, or Figma. It simply uses them the way a human would.
Reviving Legacy Technology
Every organization has legacy software — applications from a decade ago that lack APIs and resist integration with modern tools. Because Codex relies on visual recognition, you can instruct it to open the legacy application, navigate its interface, copy data, and paste it into a modern web dashboard. No backend code required.
Bypassing the Integration Tax
Managing social media or running marketing automations typically involves paying for expensive third-party tools to handle API rate limits on platforms like X (formerly Twitter) or LinkedIn. With a desktop agent, the AI simply opens Safari, composes the post, uploads the image, and clicks “Publish.”
True Cross-Application Fluidity
Tasks that jump between disconnected applications become possible through a single instruction: “Read the latest PDF in my Downloads folder, pull out the key metrics, open the presentation software, and update the slides.” Codex opens the file, reads it, switches applications, and types the changes — all without requiring the applications to communicate programmatically.
Conclusion
For forty years, we have adapted ourselves to learn the language of machines — memorizing shortcuts, navigating menus, and writing integration scripts. What the Codex announcement shows is that the paradigm has flipped. The machine has learned the language of the human interface. We are stepping out of the role of computer operators and into the role of computer managers.
FAQ
What makes Codex different from traditional automation tools like AppleScript or Selenium?
Traditional tools rely on code-level hooks — accessibility trees, DOM selectors, or API endpoints — which break when interfaces change. Codex uses semantic computer vision to recognize UI elements by their visual appearance, making it resilient to layout changes, style updates, and even entirely different applications.
Can Codex operate macOS while I continue using my computer?
Yes. Codex uses “ghost cursor” mechanics — likely virtual display buffers or targeted process-level event routing — that allow the AI to interact with applications in the background while the user retains full control of their physical cursor and keyboard.
What is the “Vision-to-Action” paradigm?
It is the shift from “Code-to-Code” automation (where applications communicate through APIs and scripts) to “Vision-to-Action” automation (where an AI perceives the visual interface and takes actions the way a human would). The GUI itself becomes the integration layer.
Which macOS system frameworks does Codex use?
Codex likely interfaces with Quartz Event Services for synthesizing mouse and keyboard events, and the Accessibility API for understanding UI structure. These are Apple’s lowest-level public frameworks for input simulation and interface inspection.