Agents don’t have an intelligence problem. They have a context problem. “Context is all your need” defines the pivotal shift in production AI for 2026: giving agents fresh, navigable, and compounding context—not just a smarter model—is what separates reliable enterprise tools from brittle prototypes. This guide unpacks why context engines like Redis Iris have become essential infrastructure, how they work, and how to implement a context layer that transforms your agents from conversational toys into dependable business systems.
What Is the “Context Problem” That Breaks AI Agents?
Most AI agents don’t fail because the model isn’t smart enough. They fail because they have no real-time sense of what’s actually happening in the business. When an agent can’t pull up the current state of a customer order, the latest inventory count, or the link between a support ticket and a shipment delay, it falls back on a generic, often useless reply. That’s not a reasoning failure. It’s a context failure.
As Rowan Trollope, CEO of Redis, puts it: “Agents don’t have an intelligence problem. They have a context problem. They fail because their context layer is scattered, stale, slow, or hard to use.” He’s pointing at a systemic issue. The data an agent needs to act intelligently is stuck inside fragmented systems, out of step with what’s happening right now, and organized without any semantic understanding of how business entities connect. What you get is an AI that can chat fluently but can’t act reliably when it counts. The fix isn’t a more powerful language model bolted onto the same brittle architecture. It’s a ground-up rethinking of how context gets gathered, organized, and served as a first-class infrastructure layer.
The Three Failure Patterns: Fragmented, Stale, and Unnavigable Context
In production, the context problem shows up in three ways that cripple AI agents. First is fragmented context: the data to answer a single question is scattered across a customer database, an order system, a shipping provider, a ticketing tool, and a dusty policy document. With no unified view, the agent sees only disjointed pieces. Second is stale context: the agent works off outdated snapshots. A warehouse table may have refreshed, a CRM record updated, or a transaction cleared, but the agent remains oblivious. Third is unnavigable context: the agent can’t follow the relationships between business entities. It can’t trace a support interaction back to the underlying customer state or link a document to the workflows that reference it. Raw data retrieval without this relational understanding leaves the agent blind to the connections that make context usable.
Why Traditional Integration Approaches Don’t Scale
Traditional ways of solving these failures collapse under production loads because they treat context as a retrieval afterthought. Manual, one-off integrations create fragile connections that break each time a system gets updated. Text-to-SQL approaches drop agents into the raw complexity of database schemas with no semantic guardrails. Basic vector search pulls up semantically similar documents but doesn’t understand business entities, their relationships, or their access rules. All these methods try to bolt context onto an agent instead of building context as a governed, always-fresh infrastructure layer. They patch symptoms without fixing the architectural problem underneath.
The Context Engine as a First-Class AI Infrastructure Layer
A context engine is a purpose-built layer that sits between an agent and the data it needs to act. It’s distinct from a vector database, a cache, or a traditional knowledge base because it provides governed, real-time, semantically navigable access to business entities and their relationships. Rather than treating context as a static pile of documents to search, a context engine models it as a structured, queryable, always-current resource agents can navigate naturally.
The living context layer pattern runs on continuous data flow. Data streams from source systems—CRMs, databases, event streams, document stores—through integration pipelines and gets organized into a semantic model that agents can traverse with natural or structured queries. This model defines the entities, fields, relationships, and access rules that matter for business operations. An agent answering “why is my order late?” can pull the correct customer, the order, the shipment status, relevant policy documents, and prior interactions in one governed flow. That’s the difference between raw retrieval and agent-native context.
A strong analogy is how people really learn inside organizations. As David Haber, General Partner at Andreessen Horowitz, explains: “You need to onboard AI like you would onboard employees. You don’t tell a new employee to pour over your existing CRM system or company wiki and expect them to get up to speed. You invite them to meetings and let them learn through osmosis.” AI agents work the same way. They absorb context through continuous exposure to real-time business operations, not by reading static documentation. A notable example is OpenAI, where, according to the a16z analysis, essentially everything is recorded. Agents stand in for senior leaders in meetings they can’t attend, ingesting years of recorded internal discussions as operational context.
Context Engine vs. Vector Database vs. Cache: Drawing the Boundary
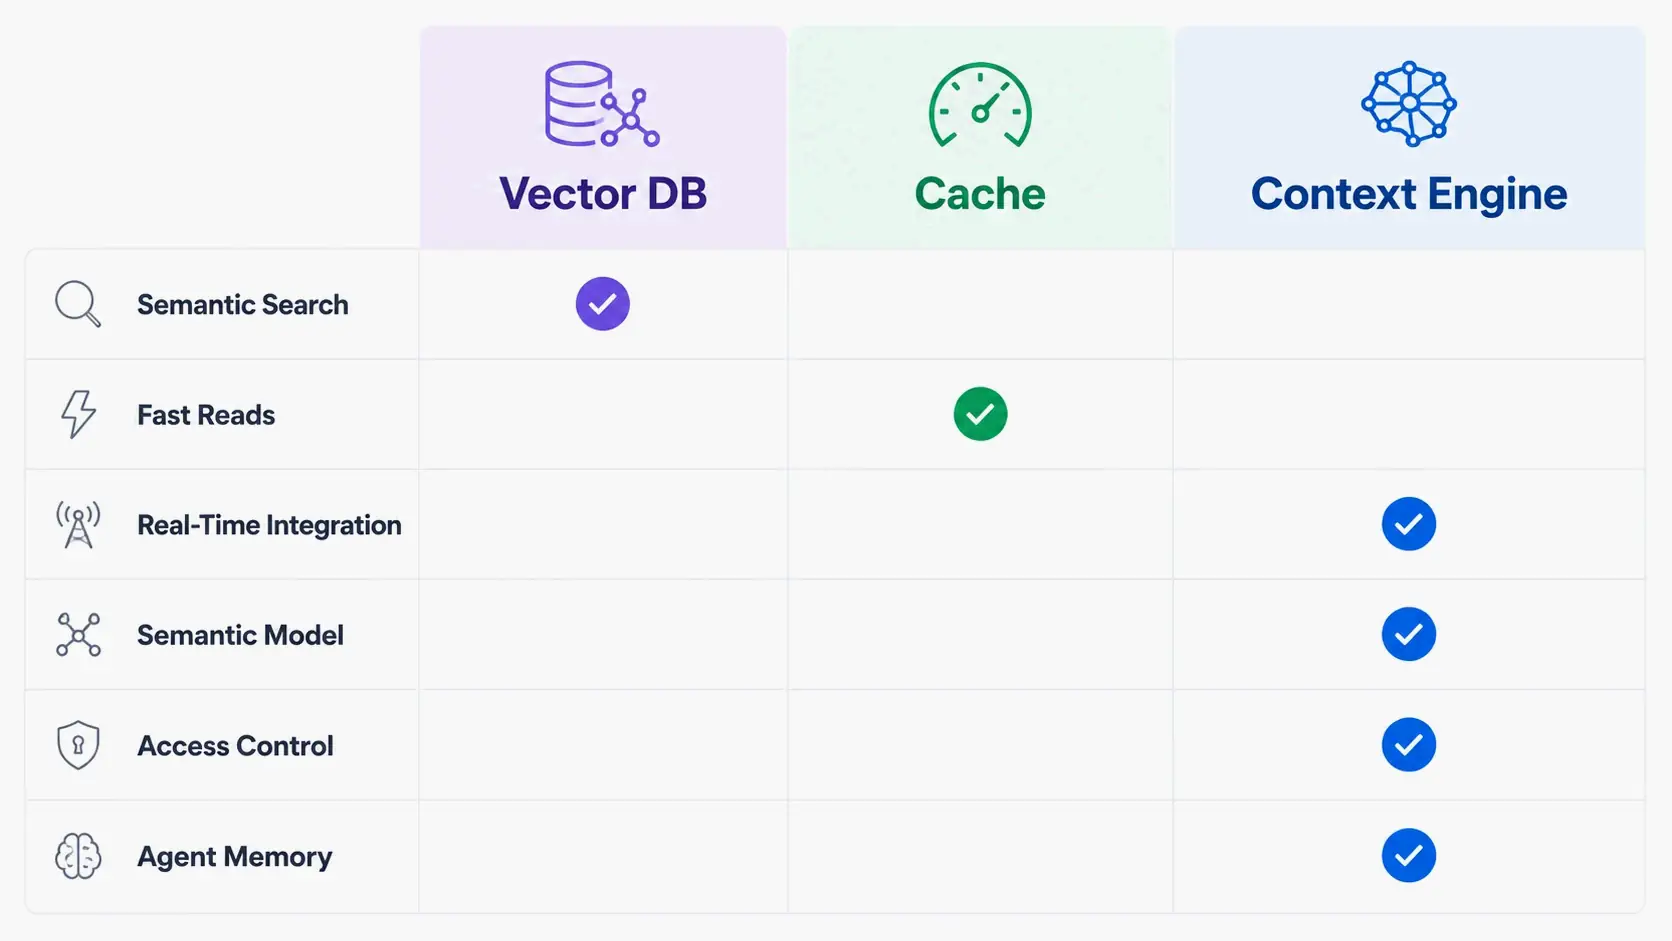
A vector database retrieves semantically similar documents. It doesn’t understand business entities, enforce access rules, or guarantee real-time freshness. A cache accelerates repeated reads but provides no semantic retrieval or governed navigation across systems. A context engine combines real-time data integration, a semantic model over business entities with access controls, structured retrieval, and agent memory into a single, governed layer. It treats context as an always-current, navigable resource, not a static index or a temporary store. This distinction matters for production systems where accuracy, compliance, and speed have to coexist.
The “Living” Context Pattern: Continuous Data Flow, Not One-Off Syncs
The living context pattern eliminates the fragility of batch synchronization. Rather than periodic dumps from source systems, data flows continuously through integration pipelines into the context layer. When a CRM record updates, a warehouse table refreshes, or a new file lands in object storage, the context engine reflects that change immediately. Agents don’t have to wait for the next sync cycle. This means they can trust that the context they’re drawing on matches the business’s current state. A static knowledge base is outdated the moment it’s created. A living context layer stays fresh because the operational systems driving the business feed it nonstop.
Inside Redis Iris: How a Context Engine Works in Practice
Redis Iris is a context engine that pulls together five components into one runtime for agent context and memory. These pieces work in concert to provide navigable, real-time, retrievable, compounding context without forcing teams to cobble together a tool zoo of vector databases, memory services, streaming pipelines, caches, and custom integration code.
The five components are Context Retriever, Agent Memory, Redis Data Integration, LangCache, and Redis Search. Context Retriever lets developers define a semantic model for business data—entities, fields, relationships, and access rules—and then automatically generates Model Context Protocol (MCP) tools agents can use to navigate that data with no custom code. Agent Memory manages both short-term conversational state and longer-term durable memory, storing reasoning steps, tool call results, and structured memories that compound across sessions. Redis Data Integration continuously ingests and synchronizes data from source systems like relational databases, data warehouses, and document stores. LangCache delivers low-latency semantic caching to cut response times and token costs. Redis Search powers the fast retrieval layer underneath the whole engine, handling vector, structured, and unstructured queries.
Redis is already deeply embedded in enterprise AI infrastructure. A 2025 survey cited by Redis found that 43% of enterprise AI agent stacks already use Redis to serve the hot operational state agents need. Iris extends that familiar infrastructure into a purpose-built context layer.
Context Retriever: Semantic Navigation with Automatic MCP Tool Generation
Context Retriever tackles the problem of making business data navigable for agents. Developers model their business domain: customers, orders, shipments, tickets, policies, along with their fields and relationships. From this semantic model, Context Retriever auto-generates MCP tools. At runtime, agents authenticate with scoped keys, discover only the tools they’re authorized to use, and execute indexed lookups through Redis and Redis Search with row-level access filters applied server-side. This replaces brittle text-to-SQL queries and one-off integrations with a governed, consistent interface any MCP-compatible agent can pick up immediately. The agent doesn’t need to know which database holds the order status or how to join tables. It navigates the semantic model as a coherent picture of the business.
Agent Memory: Why Conversation History Alone Isn’t Enough
Simple conversation history treats every interaction as a sequence of messages to replay. That falls short for enterprise work where agents need to build cumulative understanding. Agent Memory stores structured reasoning traces, tool call results, user preferences, and contextual notes that survive across sessions and interactions. An agent handling a multi-step support issue can recall the steps it already took, the decisions it made, and the information it gathered, instead of starting fresh each turn. This compounding effect makes agents more effective over time—much like experienced employees accumulate institutional knowledge that new hires lack. The memory layer turns a stateless retrieval system into a context layer that gets better with use.
LangCache, Data Integration, and Redis Search: The Supporting Cast
LangCache provides semantic caching that avoids redundant LLM calls for repeated or similar queries. According to Redis, this can save up to 90% on token costs. Redis Data Integration keeps the context layer continuously in sync with source systems, wiping out the latency and staleness of batch-only workflows. Redis Search powers the fast retrieval of vector, structured, unstructured, and real-time data that everything else sits on. These three components make sure the context layer doesn’t just stay organized and navigable. It stays fast, cost-effective, and always current.
A Practical Framework for Building Your First Context Layer
Building a context layer starts with finding a real business problem where agents currently stumble because they lack context. Common starting points: customer support bots that can’t access order data, sales assistants blind to real-time inventory, or onboarding agents with no access to prior interactions. The framework below uses a Redis Iris customer support example as a running tutorial, showing how to go from a context gap to a working system.
The core pattern stays the same: identify the entities and relationships the agent needs, set up continuous data flow, define a semantic model with access rules, enable memory so context compounds, and add caching for production performance. Tools like the Redis Cloud free tier let you prototype in under an hour, with a runnable demo repo available for reference.
Step 1: Identify the Context Gap and Map Business Entities
Start by auditing one specific agent failure. When a customer asks, “Why is my order late?”, what context was the agent missing? Map out what a good answer depends on across the business: customer identity, order details, shipment status from the shipping provider, any open support tickets, and relevant policy documents. Those become your business entities: Customer, Order, Shipment, Ticket, Policy. Define the critical fields for each entity and the relationships between them. A customer has orders, an order has shipments, a shipment might relate to a ticket. This entity map feeds directly into your semantic model.
Step 2: Configure Real-Time Data Flows and Define the Semantic Model
With your entities identified, configure Redis Data Integration to set up continuous data pipelines from the source systems. If customer records live in a CRM, order data in a transactional database, and shipment statuses come from an external provider, each needs a connection that streams updates into Redis. Next, define the semantic model in Context Retriever. Specify the entities, their fields, the relationships between them, and the access rules that control which agents or users can see what data. For example, a support agent might see full customer details while a self-service bot only gets masked information. From this model, Context Retriever auto-generates MCP tools. An MCP-compatible agent can then call a tool like get_customer_orders(customer_id) and get governed, current results without any custom integration code.
Step 3: Enable Agent Memory and LangCache for Production Readiness
Once the context layer is serving fresh, navigable data, turn on Agent Memory to store interaction history, reasoning steps, and tool call results. Now your support bot can reference prior conversations and decisions across sessions, building cumulative understanding of the customer’s situation. Then configure LangCache to cache semantically similar queries. When multiple customers ask variations on the same shipping question, the cached response avoids redundant LLM calls, cutting both latency and token spend. At this point, the agent has grown from a conversational prototype into a production tool that acts on current business reality.
Context Beyond AI Agents: Why “Context Is All You Need” Applies Everywhere
The idea that context determines performance reaches well beyond AI engineering. In writing, context is what turns a statistic from a misleading abstraction into a truthful insight. A figure like “less than 6% of people with eating disorders are clinically underweight” only works when you add the surrounding detail: how the study was conducted, the population surveyed, its limitations. Without that, you risk reinforcing new misconceptions. In investing, context separates informed capital allocation from speculation. A CNBC analysis notes that short-term stock movements driven by momentum and “animal spirits” can only be understood by zooming out to see the broader trend, the fundamental strength of the business, and the market conditions that produced the volatility. In leadership, context is what makes decisions situationally appropriate instead of merely textbook-correct. The same framework dropped into a different organizational culture, market cycle, or historical moment can fail if it ignores the specifics of that environment.
Even within AI development, the importance of structured, navigable context is explicitly recognized. The Claude API documentation from Anthropic recommends structuring prompts with XML tags, placing longform data at the top of the context window, and providing hierarchical organization so the model can parse complex instructions and document sets without ambiguity. The model performs better with navigable, hierarchical context than with an undifferentiated wall of text. The common thread across all these domains is the same: raw information alone isn’t enough. The ability to assemble, navigate, and keep context fresh is what elevates performance—whether the task is building an agent, crafting an argument, or making a capital allocation decision. Confident mistakes happen when people rely on data stripped of its relational, temporal, and situational meaning.
The Engineering Tradeoffs: Context Depth vs. Latency vs. Cost
Deep context improves agent accuracy but also eats more tokens and adds latency. Production systems need to balance three quantitative dimensions: stale context costs accuracy points by feeding agents outdated information, missing context forces agents to hallucinate or deflect to generic responses, and bloated context burns tokens and slows response times. A context engine gives you levers to manage these tradeoffs without per-agent manual engineering.
LangCache avoids redundant LLM calls for repeated queries, directly lowering both latency and cost. Semantic scoping in Context Retriever ensures agents retrieve only the entities and fields relevant to the current task, rather than full document dumps that inflate token usage. Agent Memory stores and prioritizes context, compressing older or less relevant information so the agent works with a focused, high-signal set rather than an ever-growing history. Precisely scoped, real-time, semantic retrieval balances accuracy, speed, and cost in a way fragmented toolchains can’t match.
Security and governance matter just as much. Access rules defined in Context Retriever enforce that agents only see data they’re authorized to access. This directly addresses the PII and compliance challenges that frequently block enterprise AI deployments. An agent answering a customer’s question doesn’t need unfettered access to the entire database. It needs governed, scoped access to the specific entities and fields that are relevant and permissible. The context engine architecture embeds these controls at the infrastructure layer, so compliance is built in rather than bolted on afterward.
Conclusion
“Context is all you need” isn’t a clever phrase. It’s the engineering principle that separates AI agents that perform reliably in production from those that impress in demos but collapse under real conditions. The infrastructure to solve the context problem systematically exists today. No more heroic, per-agent integration work is required. The practical first step: audit one agent’s failure cases, identify the specific context it lacked, map the entities and relationships it needed, and prototype a context layer on Redis Cloud to measure the accuracy improvement. The first context-aware agent is usually the hardest to build. After that, the infrastructure compounds across every subsequent agent, creating a foundation where each new deployment inherits the governed, real-time, navigable context that makes AI trustworthy at scale.
FAQ
What makes a “context engine” different from a vector database or a cache?
A vector database retrieves semantically similar documents but lacks an understanding of business entities, their relationships, and access controls, and it cannot enforce real-time freshness. A cache accelerates repeated reads but provides no semantic retrieval or governed navigation. A context engine combines real-time integration, a semantic model with access rules, structured retrieval, and agent memory into a single governed layer that treats context as an always-current, navigable resource.
How can I add real-time context to my AI agents without building custom integrations?
Redis Data Integration provides pre-built connectors to common enterprise systems—CRMs, databases, event streams—that continuously sync data into the context layer, eliminating brittle one-off code. The Context Retriever then auto-generates MCP tools from the semantic model, giving any MCP-compatible agent immediate, governed access to real-time business context without additional integration work.
Why is “memory” so important for AI agents in enterprise settings?
Without memory, agents treat every interaction as a blank slate, unable to reference past decisions, learn from prior interactions, or build cumulative understanding of a customer or process. Enterprise-grade Agent Memory stores structured reasoning traces, tool call results, and contextual notes, allowing agents to compound knowledge session-over-session—similar to how experienced employees accumulate institutional knowledge that new hires lack.
How does the “context is all you need” idea apply outside of AI, such as in writing or investing?
In writing, context determines relevance, tone, and persuasiveness—the same message can fail or succeed based on whether it accounts for the reader’s prior knowledge and current situation. In investing, context—macro conditions, industry cycles, and management track record—prevents investors from mistaking luck for skill or applying the wrong framework. The common principle is that raw information without navigable, fresh context leads to confident mistakes, whether by an LLM, a writer, or an analyst.