Set JPEG quality to 70-80%, convert to WebP for up to 95% size reduction, and resize to target dimensions before compressing. For government portals, cap at 96 DPI and 2MB. These three steps handle the vast majority of image compression needs in 2026.
Compression Workflow: Resize → Format → Quality
The order matters. Always resize first, then choose format, then apply quality compression.
| Step | Action | Why First |
|---|---|---|
| 1. Resize | Scale to target width (e.g., 1200px for web) | Reduces pixel count — largest size savings |
| 2. Format | Convert to WebP (or AVIF) | 25-35% smaller than JPEG at same quality |
| 3. Quality | Set to 70-80% | Removes data invisible to the human eye |
Resolution and Dimensions
For web use, set DPI to 72-96. 300 DPI is for print — it adds no visual benefit on screens but inflates file size. Resize before compressing: a 4000px smartphone photo should be scaled to 1200px (blog) or 1080px (social media). This gives the compression algorithm a manageable base.
The 70-80% Quality Rule
Data from Business.com confirms that 70-80% quality (on a 100-point scale) is the sweet spot — significant size reduction with virtually no visible quality loss.
| Quality Setting | File Size Reduction | Visual Impact |
|---|---|---|
| 90-100% | Minimal (10-20%) | Visually identical to original |
| 70-80% | 40-60% (JPEG) | Indistinguishable to human eye |
| 50-60% | 60-75% | Slight artifacts visible on close inspection |
| Below 50% | 75%+ | Visible pixelation — not recommended |
This directly impacts SEO. Google’s Core Web Vitals (specifically LCP — Largest Contentful Paint) often flags unoptimized images as the primary cause of slow sites. Illustrate Digital (2023) found that a 1-second load time yields 5× higher conversion rates than a 10-second load time for B2B sites.
WebP vs. JPEG vs. AVIF: Format Comparison
| Format | Compression vs. JPEG | Browser Support (2026) | Best For |
|---|---|---|---|
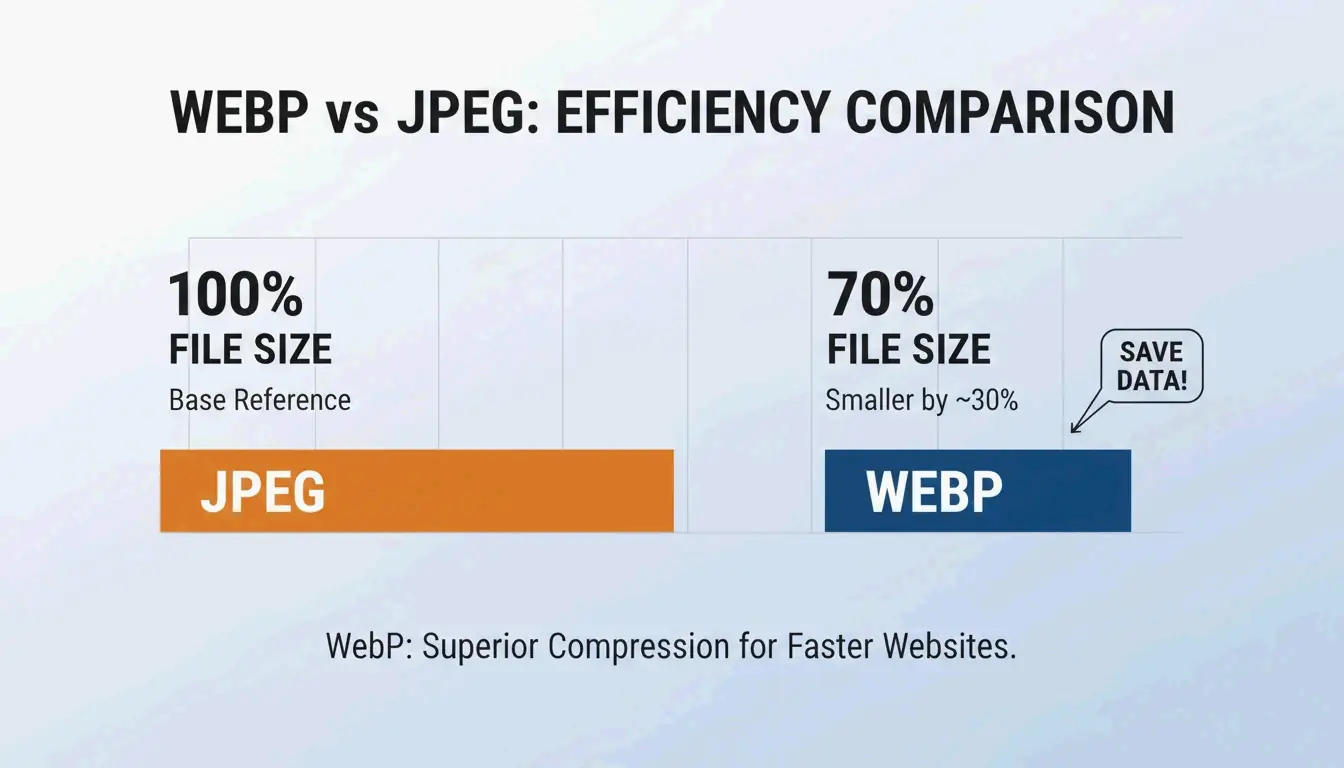
| WebP | 25-35% smaller | 97%+ | General web use |
| AVIF | 50% smaller | 92%+ | Maximum compression |
| JPEG | Baseline | 100% | Universal compatibility |
| PNG | 2-5× larger than JPEG | 100% | Transparency, sharp edges |
A SkyToolz Benchmark converted an 8.2MB smartphone JPEG to a 420KB WebP at 80% quality — a 95% size reduction with no visible quality loss.
Tool Comparison: Free vs. Professional
| Tool | Cost | Best For | Key Feature |
|---|---|---|---|
| ImageLean | Free | Quick browser-based compression | “Compress to Target Size” for exact file size limits |
| Adobe Photoshop | Paid | Precise manual control | Quality slider with live preview in “Export As” |
| TinyPNG | Free (20 images) | Batch processing | 60-80% reduction, auto-optimized per image |
Salsify’s 2025 Consumer Research Report found that 42% of shoppers abandon purchases when product images are missing or low-quality — making compression accuracy a revenue concern.
Photoshop “Export As” Workflow
- File → Export → Export As
- Select format: JPG or WebP
- Set quality slider to 70-80
- Check estimated file size in the preview window
- Export
TinyPNG Batch Processing
Drag and drop up to 20 images. TinyPNG analyzes each file and applies optimal compression automatically — no manual configuration required.
Platform-Specific Target Specifications
| Platform | Format | Max File Size | Max Width | DPI |
|---|---|---|---|---|
| Web blog post | WebP | < 200 KB | 1200px | 72-96 |
| Government portal (e.g., IRCC) | JPG / PDF | < 2 MB | Variable | 96 |
| Email attachment | JPG | < 1 MB | 1000px | 72 |
| Social media (Instagram) | JPG / PNG | < 500 KB | 1080px | 72 |
For government portals like IRCC, resize to 1200-1500px width and set DPI to 96 before compressing. Tools like ImageLean’s “Compress to Target Size” function hit these limits directly.
For social media, pre-compress to 1080px width to control quality yourself rather than letting the platform’s algorithm recompress.
Conclusion
Compress pictures in three steps: resize to target dimensions, convert to WebP, and set quality to 70-80%. For government uploads, add the 96 DPI constraint. Check your site’s LCP score — if images are the bottleneck, switching to WebP alone can reduce total image weight by 60-80% without visible quality loss.
FAQ
How do I compress an image without losing any quality?
Use lossless compression (PNG-24, OptiPNG) which removes metadata without altering pixels. WebP also maintains near-lossless visual fidelity at file sizes 25-35% smaller than JPEG — appearing “lossless” to the human eye even at lossy settings.
What is the best JPEG quality setting for website performance?
70-80 out of 100. This range delivers 40-60% file size reduction with no perceptible quality loss. Below 50, visible pixelation and compression artifacts appear, damaging user trust and brand perception.
How do I batch compress photos on Windows 10/11?
For small batches, use the built-in Photos app “Resize” feature. For professional volumes, use Adobe Photoshop’s “Batch Action,” PowerToys Image Resizer, or TinyPNG (up to 20 images per batch, free).
Why is my compressed image still too large for government portal uploads?
The pixel dimensions are too high. A 4000px-wide image cannot compress below 500KB with quality settings alone. Per IRCC guidelines, resize to 1200-1500px width and set resolution to 96 DPI before applying compression.
Leave a Reply